
6. Usage

6.1 How to use
- Link a Supplier to your registrar/DNS provider and configure its API credentials (Suppliers > Domain Manager tab).
- Run domain discovery (or wait for the next scheduled sync) to import all domains from that account.
- Open a Domain: the injected panel shows the read-only registrar, detected DNS provider, sync status, and a manual "Update Now" button.
- Review DNS Records on the domain: records pulled from the provider are marked as managed and locked; edit unlocked fields as needed.
- To push a DNS change live, edit an A/AAAA/CNAME/TXT record on a domain linked to a write-capable provider (Cloudflare, IONOS or Dinahosting) and save — the plugin validates and pushes it to the provider.
- Use the Domain list's "Sync now" massive action to force an immediate sync on selected domains instead of waiting for the cron.
- Check the Domain Manager dashboard cards for a portfolio-wide view: domains per registrar/DNS provider, domains by TLD, sync status, and domains expiring soon.
6.2 Monitoring a domain and its DNS records
Once a domain is managed by Domain Manager, its own record shows a live status panel — registrar, DNS provider, sync health — and its DNS zone becomes editable from GLPI when the provider supports write-back.
6.2.1 Open the domain’s Domain Manager panel
Open the domain from Assets → Domains. The Domain Manager panel on its main tab shows which Supplier acts as registrar and which one as DNS provider, plus a sync status badge for each — green for healthy, red for a failed sync, grey for "never synchronized".
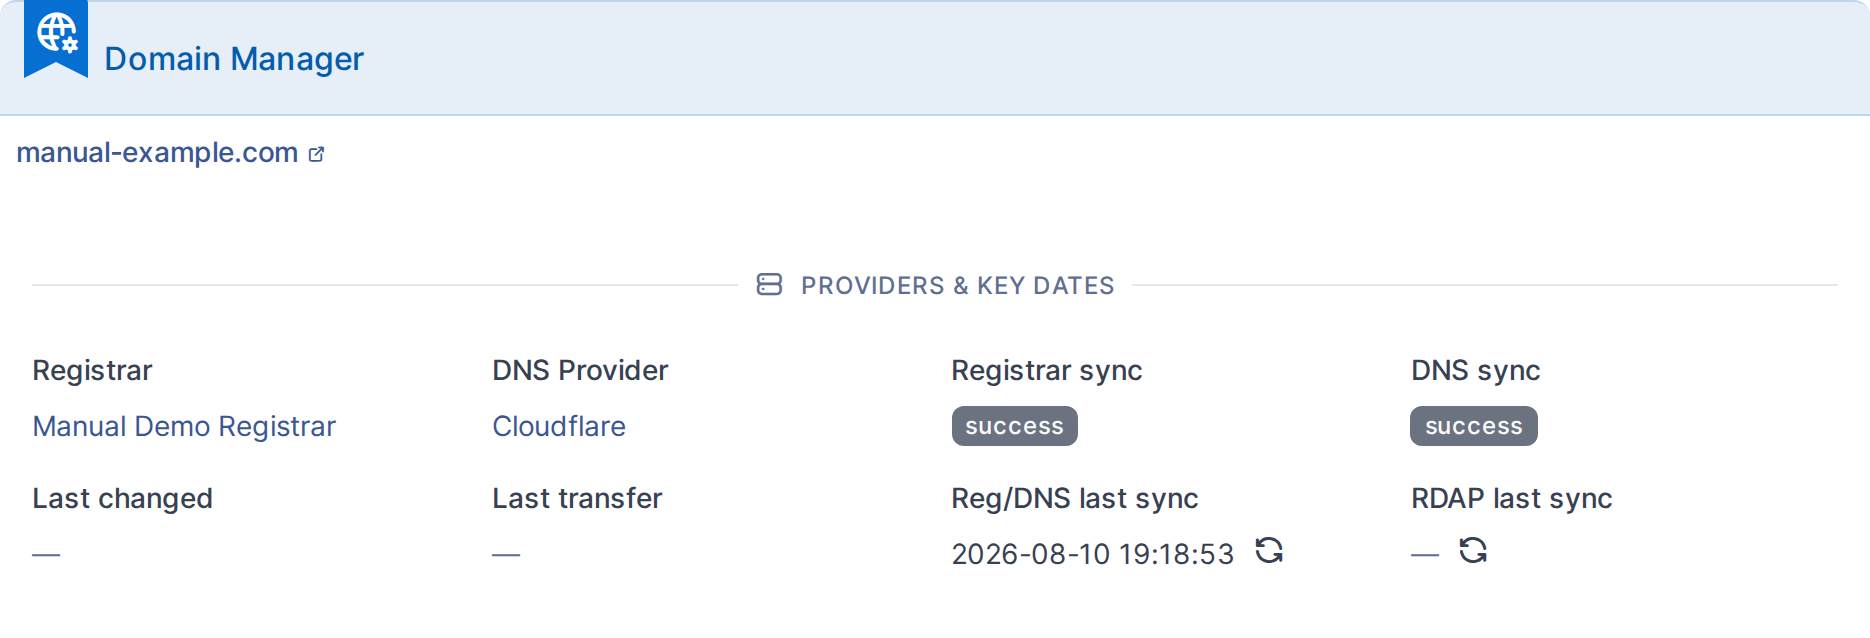
The Domain Manager status panel on a managed domain
6.2.2 Open the domain’s DNS records
Switch to the domain’s Records tab to see its DNS zone. Records synced from the provider are locked against manual edits — this keeps GLPI from drifting out of sync with what the DNS provider actually serves.

The domain’s DNS records, synced from its provider
6.2.3 Add a DNS record
On a domain whose DNS provider supports write-back (here, Cloudflare), a New record form appears in place of the usual "Link a record" form. Creating a record here pushes it live to the DNS provider immediately, not just to GLPI's copy of the zone — the confirmation prompt exists for that reason.
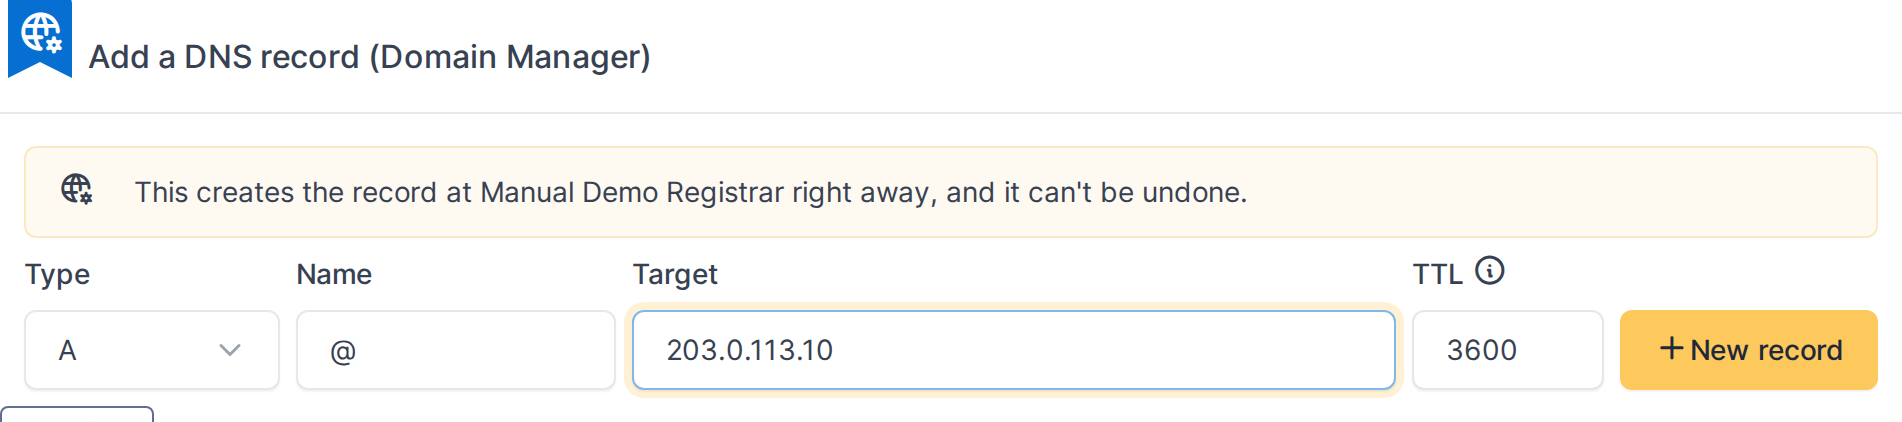
Adding an A record; this will be created live at the DNS provider
Note: Fields populated by the last sync (registration date, expiry, existing record values) are locked by default. A user with the "Unlock imported domain data" right can edit them anyway — useful when the provider reported something wrong.
6.3 Bulk-importing domains from a Supplier
Once a Supplier's API driver is configured, Domain Manager can discover all domains in that provider's account. Importing multiple domains at once is faster than adding them one by one.
6.3.1 Open the Import Domains dialog
In the Domain Manager tab on a Supplier, click the Import button. This opens a modal showing every domain the provider's account contains that isn't already tracked in GLPI.
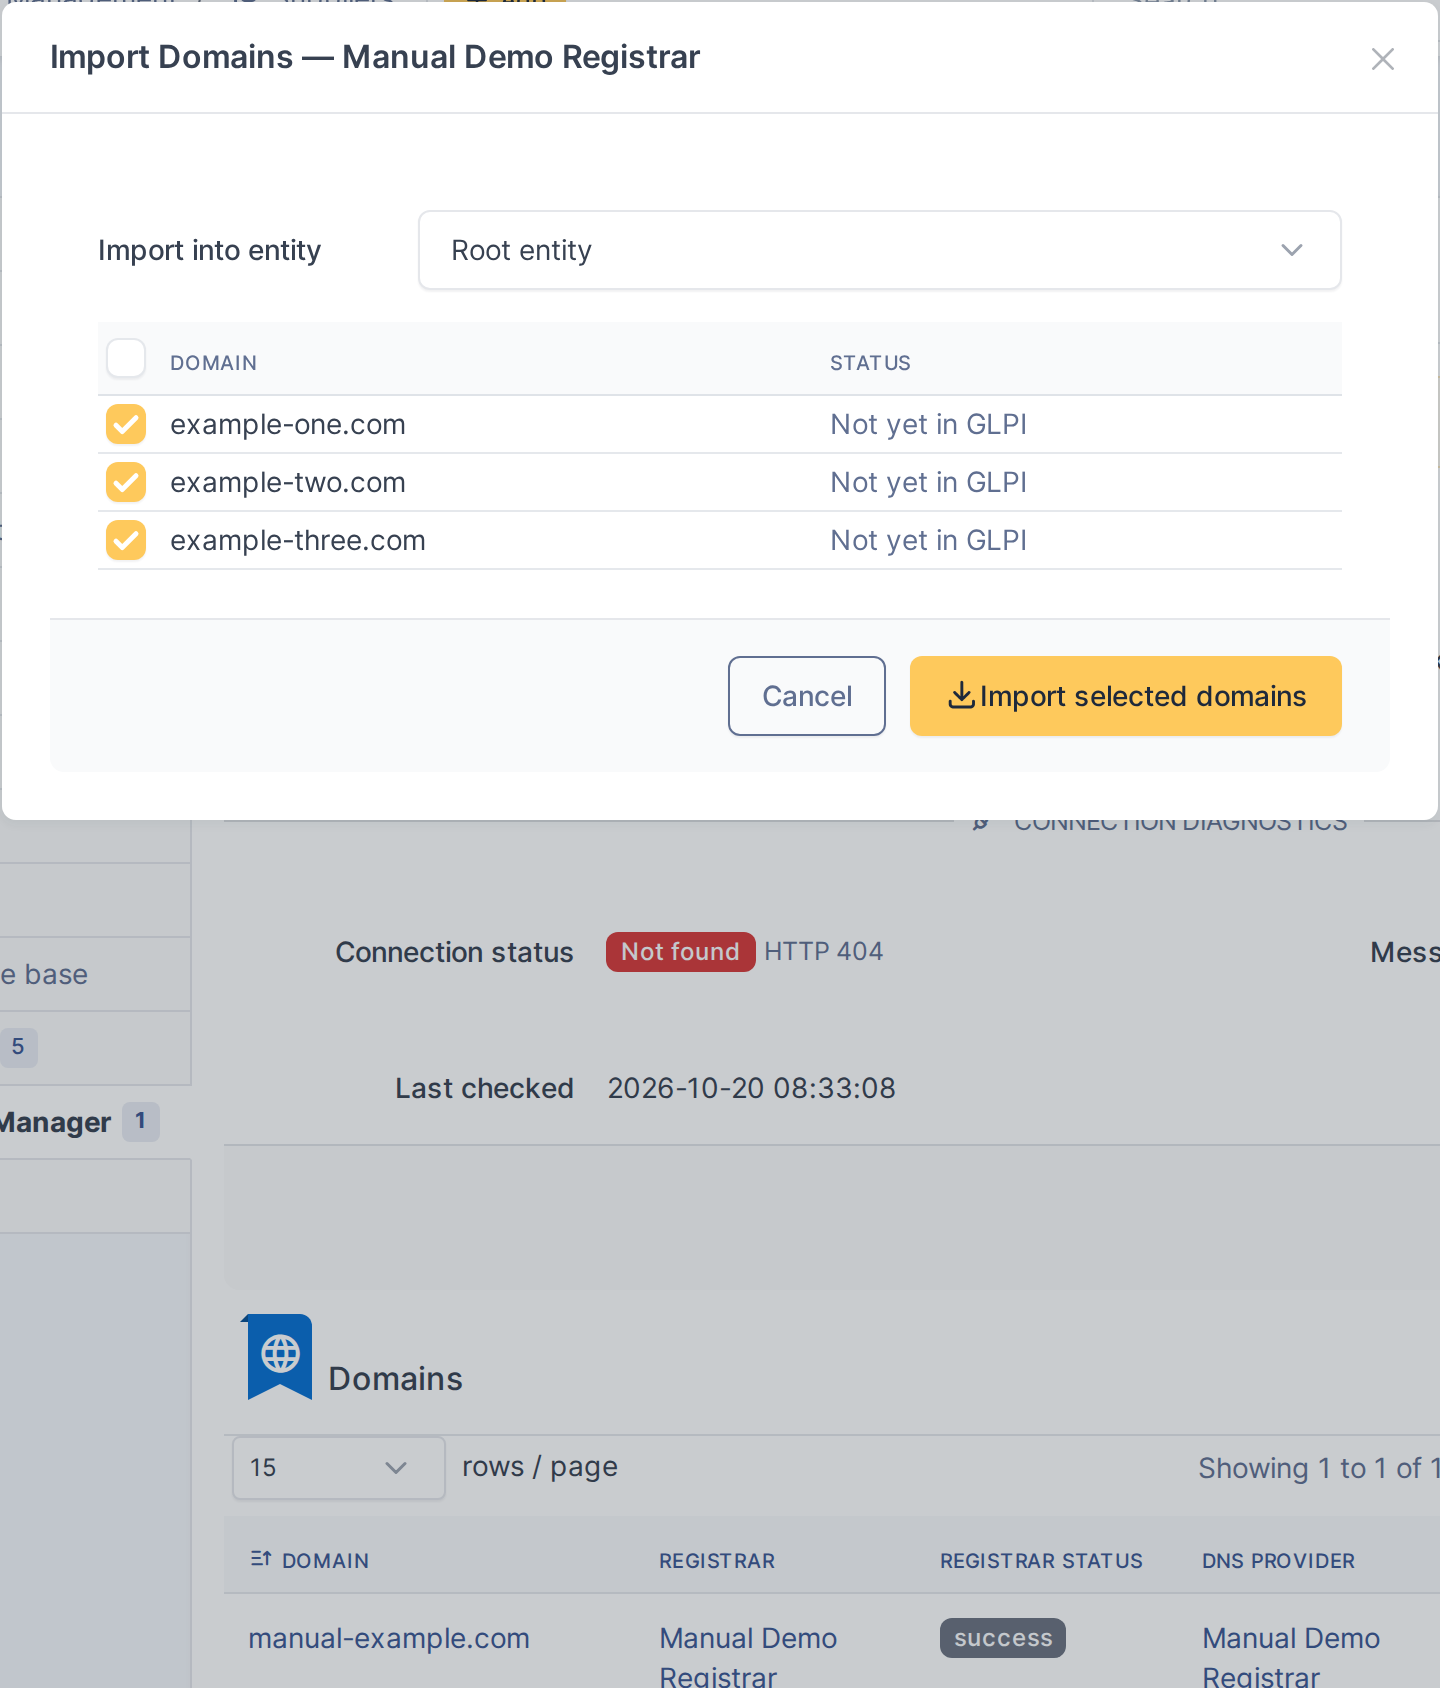
The domain import dialog showing multiple domains available to import
6.3.2 Select domains to import
Each domain in the list can be checked or unchecked independently. Domains already in GLPI are shown with the Already exists label and cannot be selected. Use the checkbox in the header to quickly select or deselect all pending domains at once.
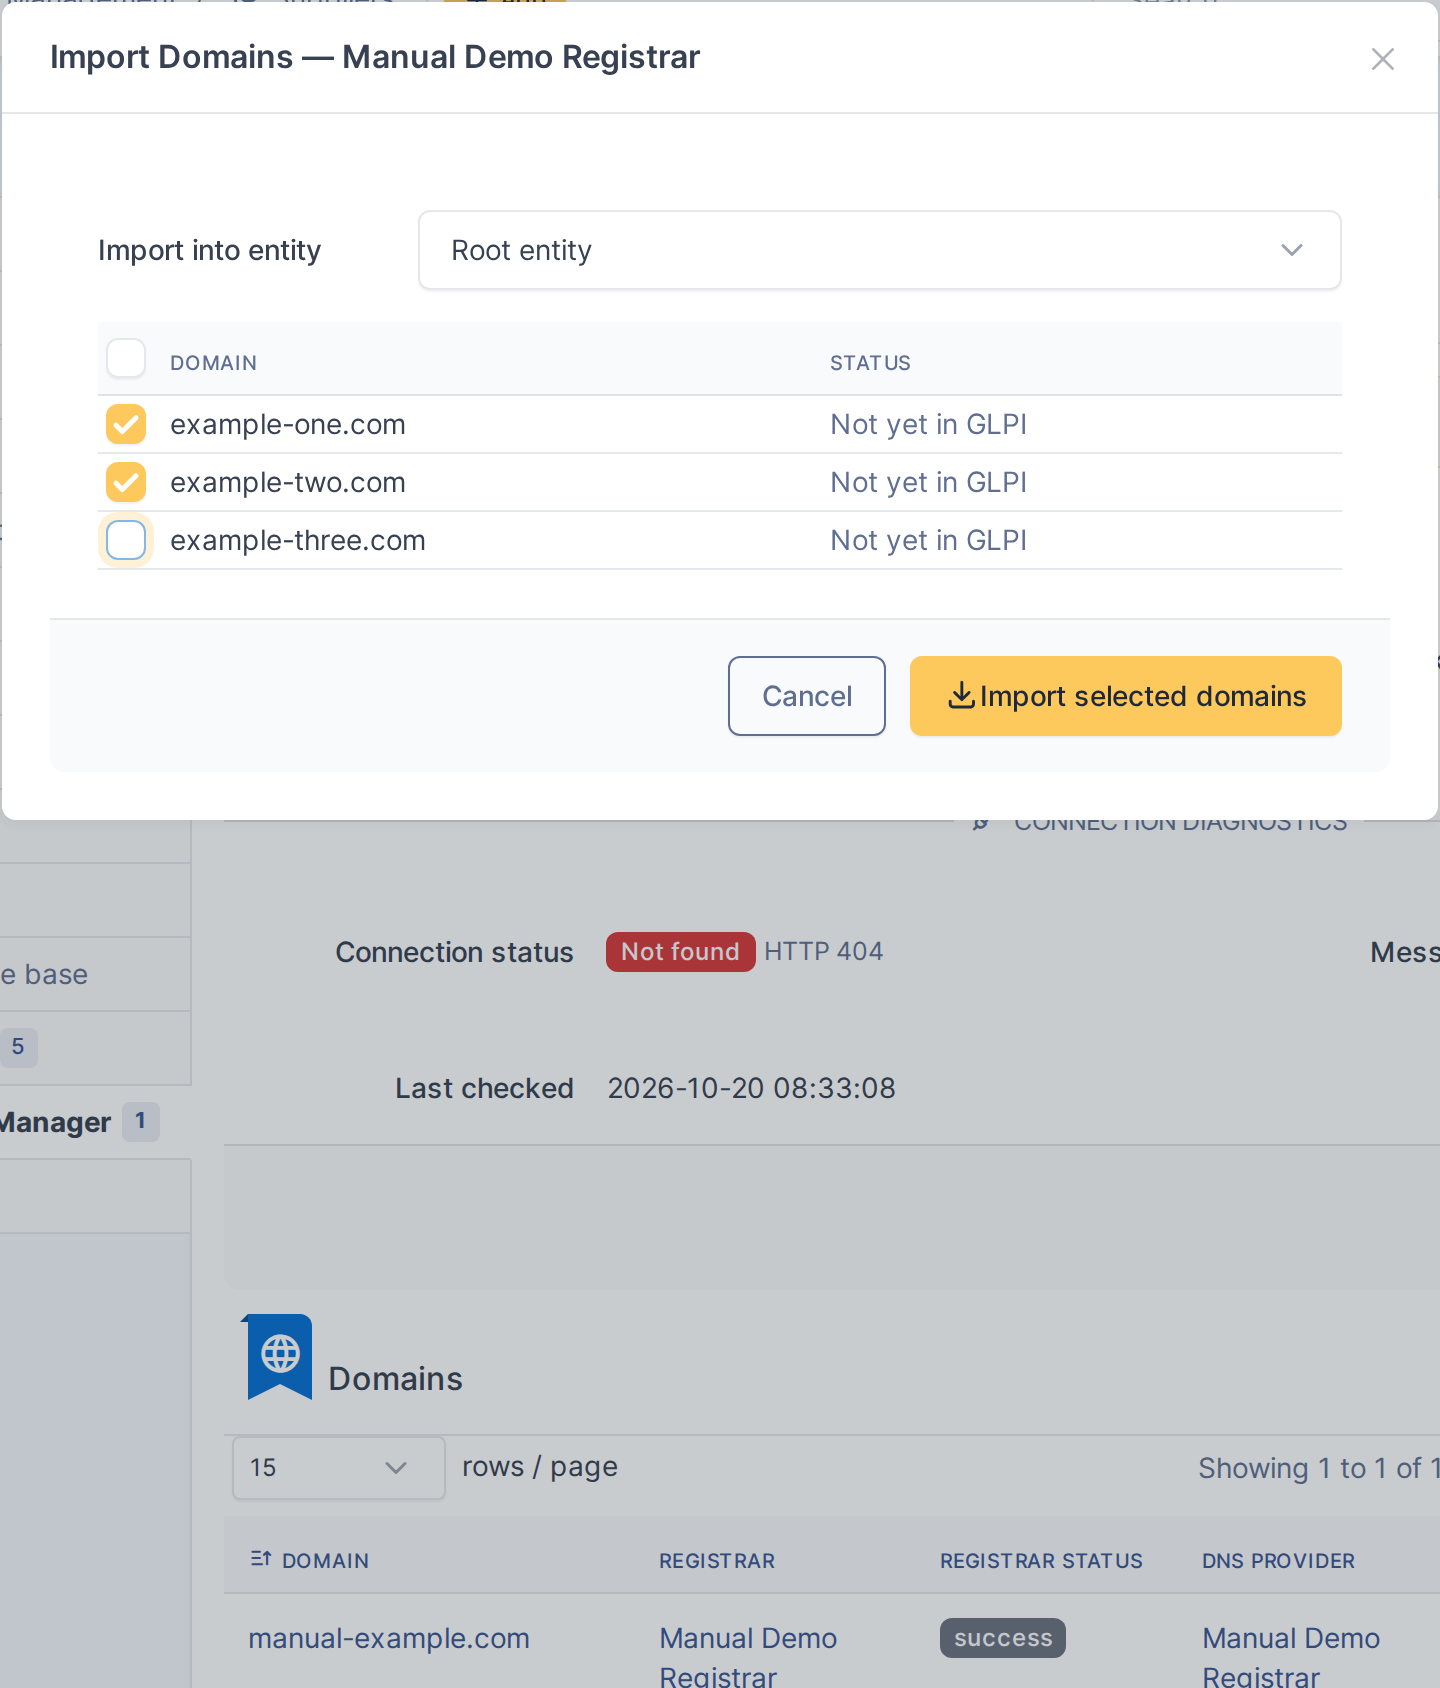
Two domains selected, one deselected (Domain Manager will import only the selected ones)
6.3.3 Complete the import
Click Import selected domains to create all checked domains in GLPI. They appear immediately in your domain list and automatically start syncing on the next cron run; no manual intervention is needed after import.
Note: The imported domains are now part of your domain inventory. Their first sync happens automatically on the next scheduled sync run (typically within minutes), and they sync thereafter on your configured interval.
Note: Importing multiple domains at once is much faster than creating them individually. After import, all domains are treated identically: they sync automatically, show status, and support DNS record management just like any domain you created by hand.
6.4 Importing domains from the Domains list
You can also start an import from the Domains list itself, without going to a Supplier first. Only suppliers with a provider connection and credentials are offered.
6.4.1 Click Import
Open Management → Domains and click Import in the page header. A dialog opens with the domains your provider account holds that are not in GLPI yet. If more than one supplier is connected, you first choose which one to import from.

The Import link in the Domains list header
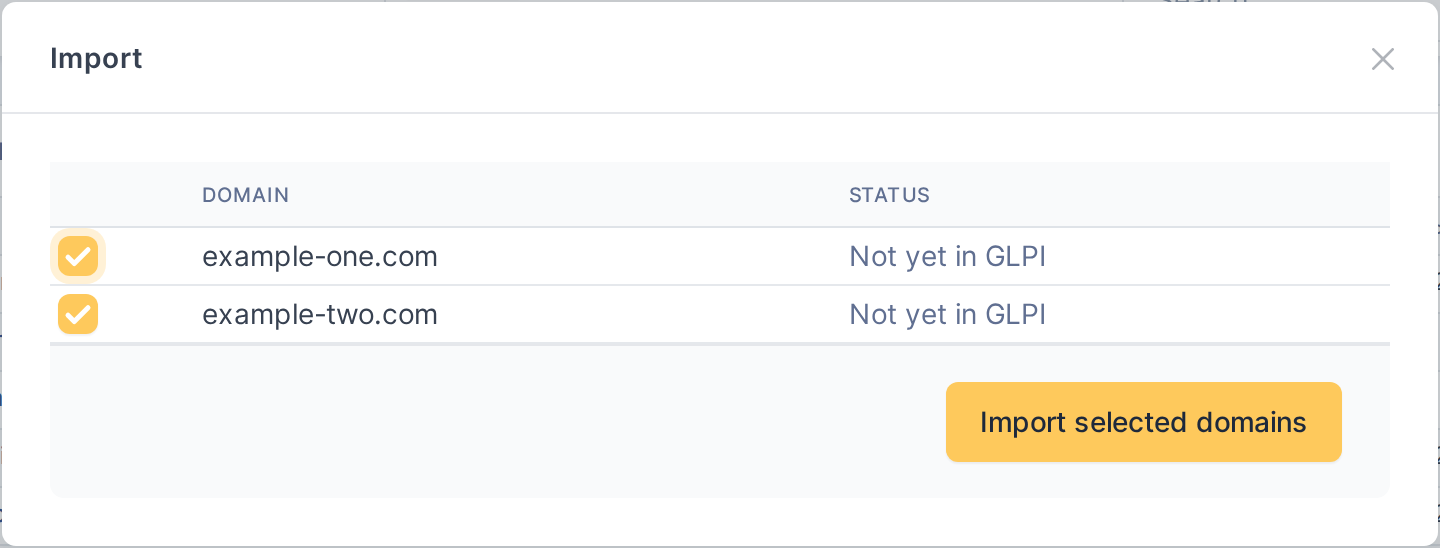
The import dialog opened from the Domains list
Note: From here the dialog works exactly as described in the Supplier import chapter.
6.5 Editing an existing record & the managed/locked-field state
Domain Manager imports DNS records by syncing them from your provider's live account. Some records can be edited here; others are locked because the provider hasn't confirmed that your edits would succeed.
6.5.1 Open a record that can be edited
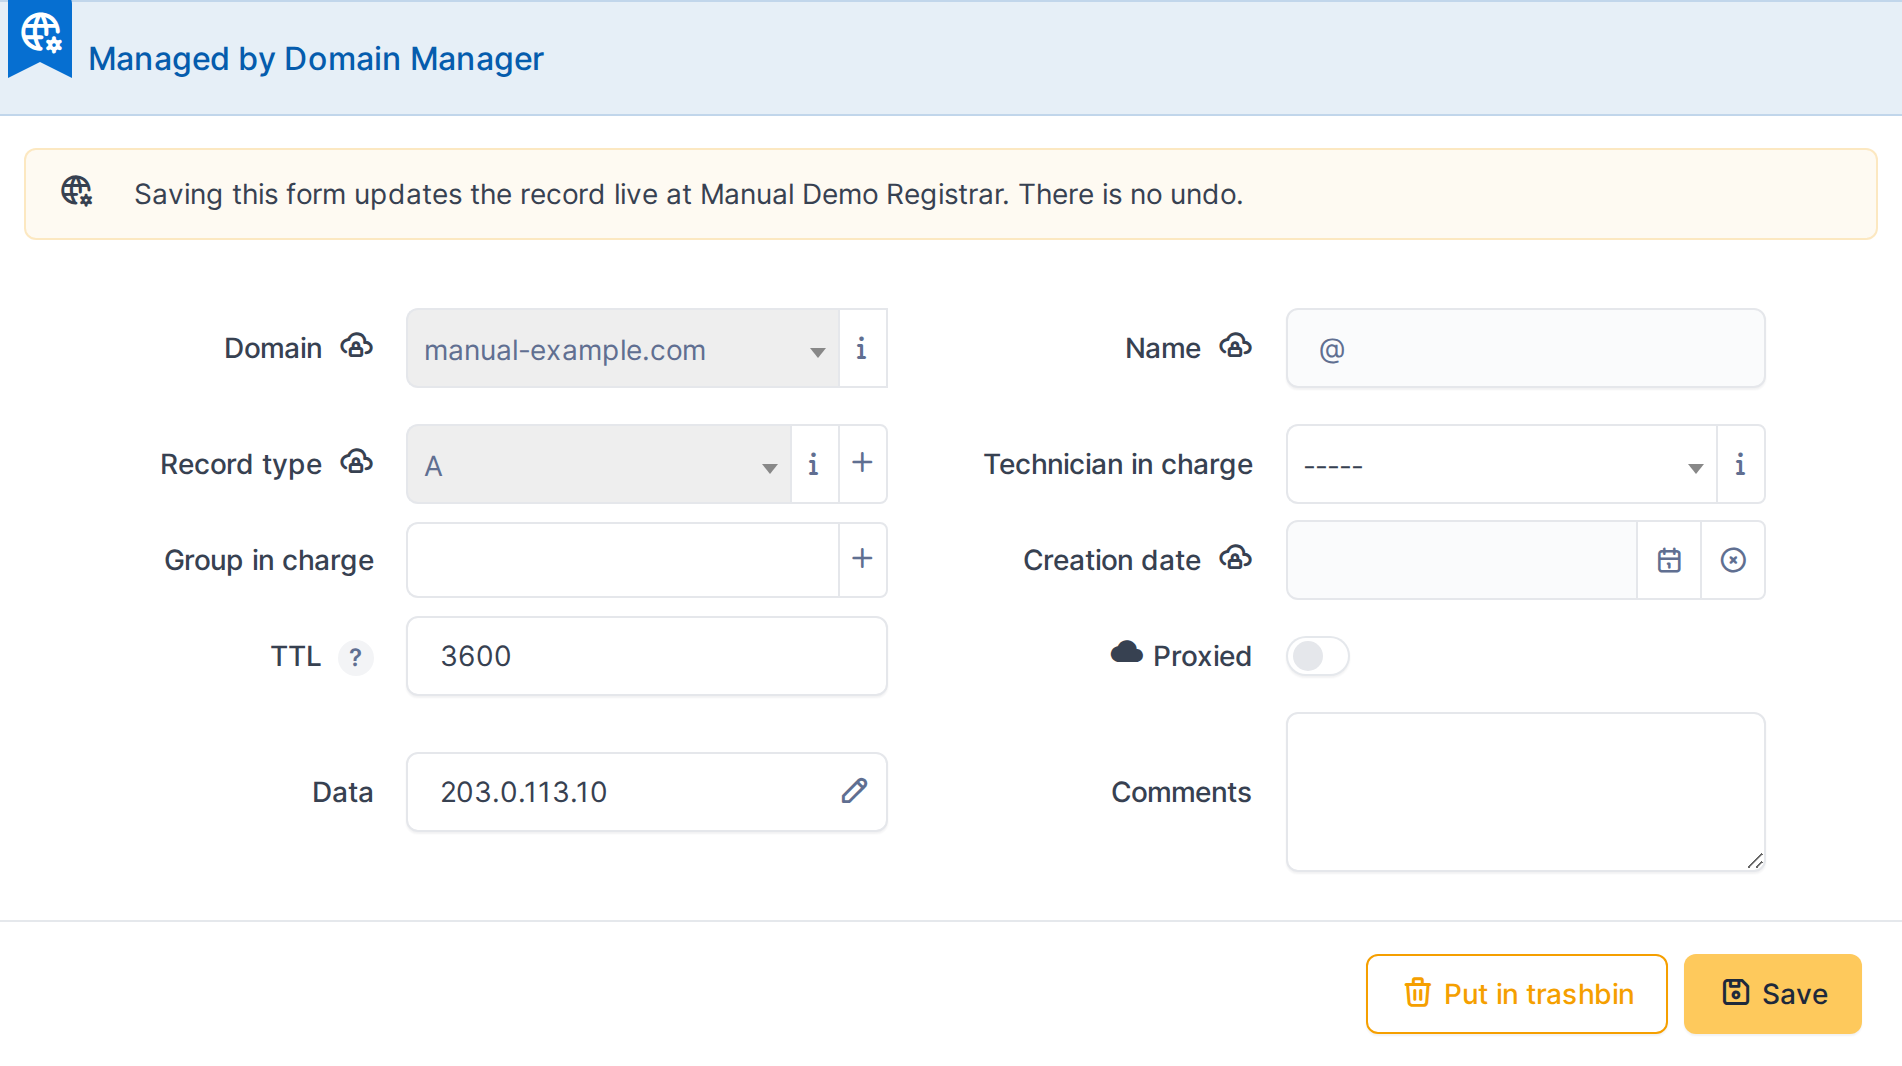
The data and TTL fields are editable (no lock icons)
6.5.2 Make a change and review before saving
Type a new value (the form doesn't require you to submit, so you can review the change). Notice there's no lock icon next to data or TTL — they're fully editable.
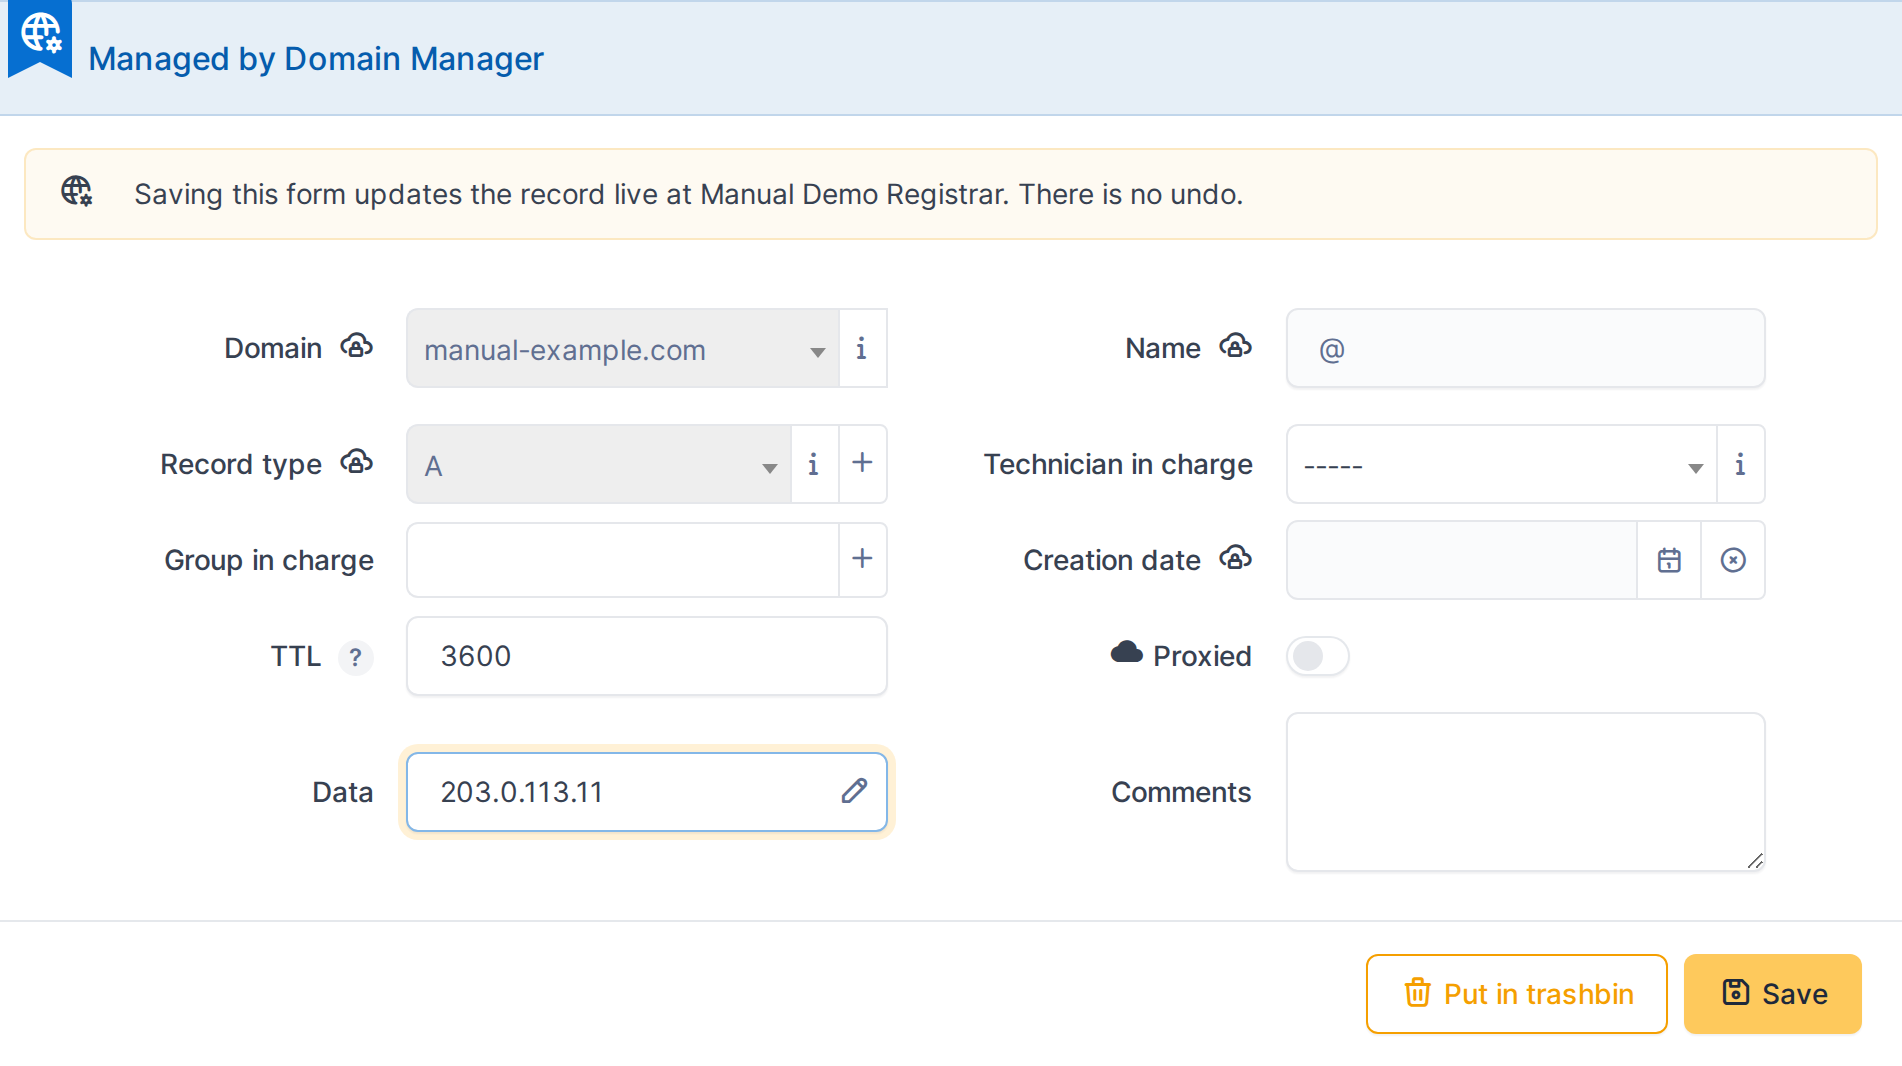
The form shows your change ready to save (no undo once submitted)
6.5.3 Open a record that cannot be edited
Go back to the domain list and open a different domain whose DNS provider is in a read-only state (write-back failed or never succeeded). Records on this domain cannot be edited here.
6.5.4 See the locked-field explanation
The form shows an alert explaining that this record is imported by Domain Manager synchronization and cannot be edited. This happens when the provider hasn't confirmed that write-back would succeed.

The alert explains why this record cannot be edited
6.5.5 Notice the lock icons on editable fields
Look at the data and TTL fields — they have a lock icon next to them, indicating they're read-only. The fields are disabled, preventing any changes.

The data field has a lock icon and is disabled
6.5.6 Why records become locked
Domain Manager locks imported records until a successful write confirms the provider can push updates. Once a write succeeds, these fields unlock. If the provider returns an error, the fields stay locked (the "read-only" state shown here). A user with the Unlock imported domain data right can override the lock if needed.
6.6 Records that exist only in GLPI
A record created in GLPI is normally pushed to the DNS provider. If that request times out, the record may exist in GLPI only. Domain Manager flags such records and lets you check.
6.6.1 Spot the warning
Open the record from the domain's Records tab. A yellow warning says the record is only in GLPI and may not exist at the DNS provider.
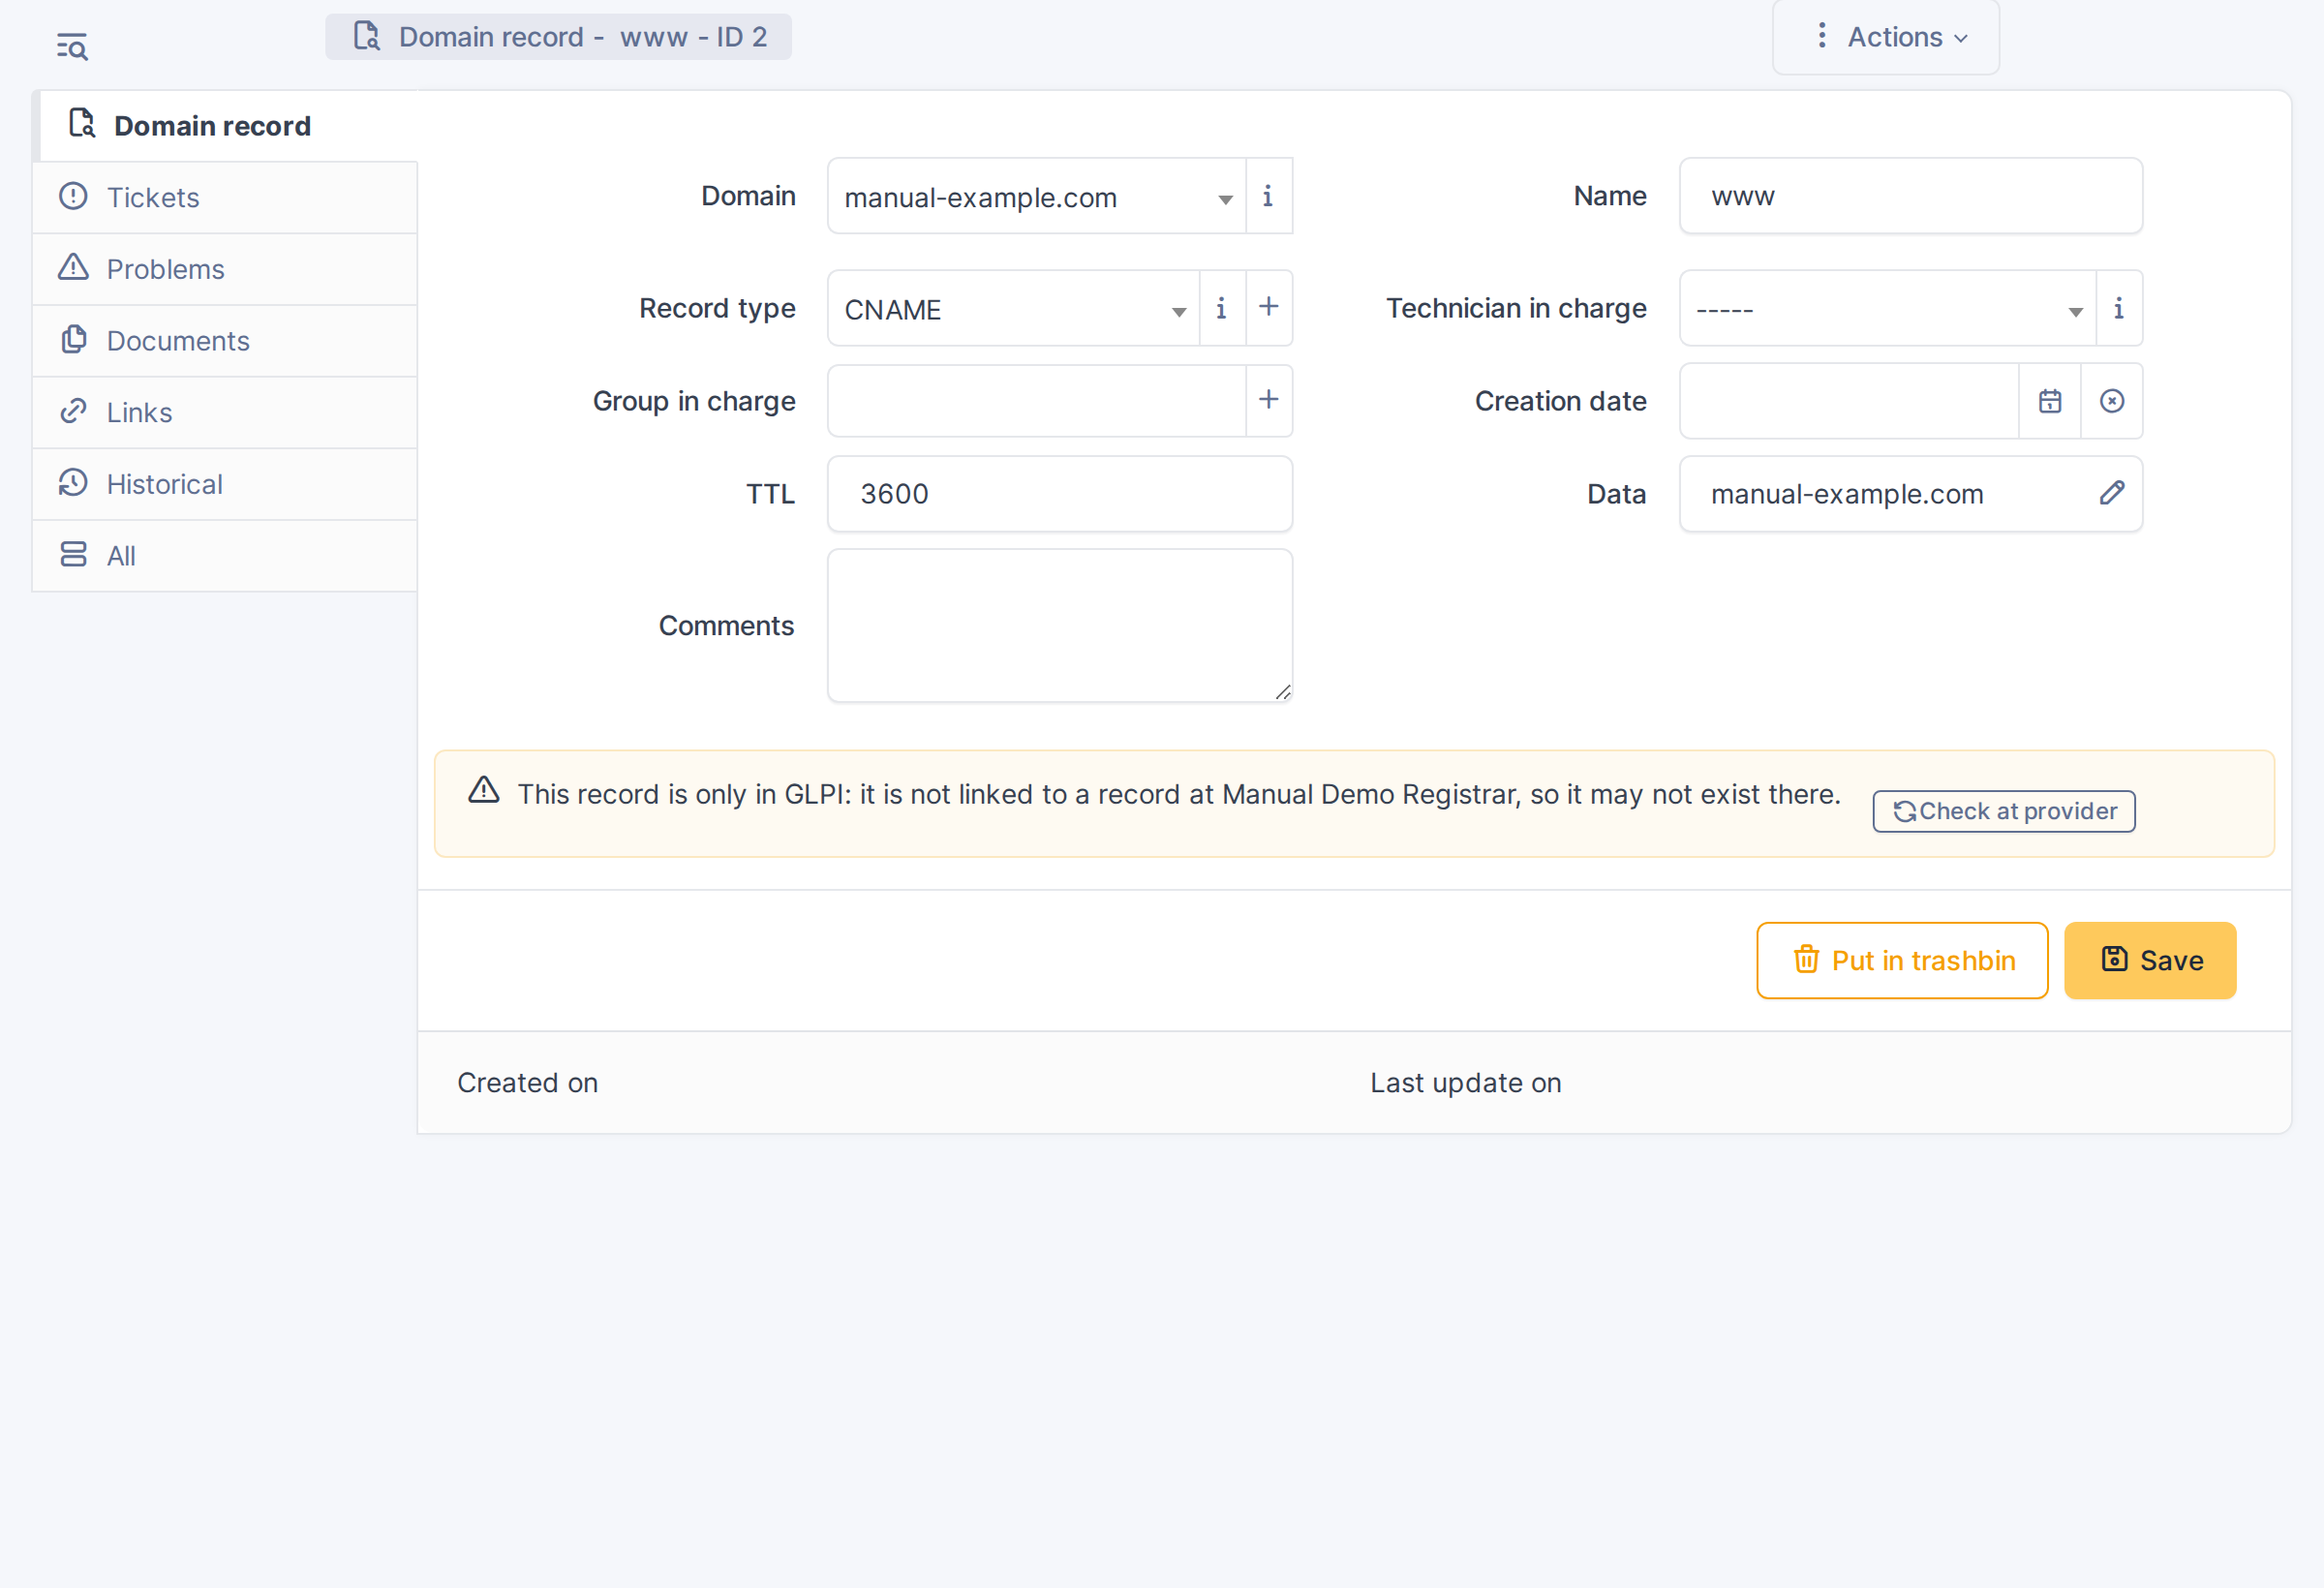
A record that is not linked to a record at the provider
6.6.2 Check at the provider
Click Check at provider. If the record is found it is linked and the warning goes away. If it is not found, the result says so and Remove from GLPI only appears. That button deletes the record from GLPI and never touches the provider.
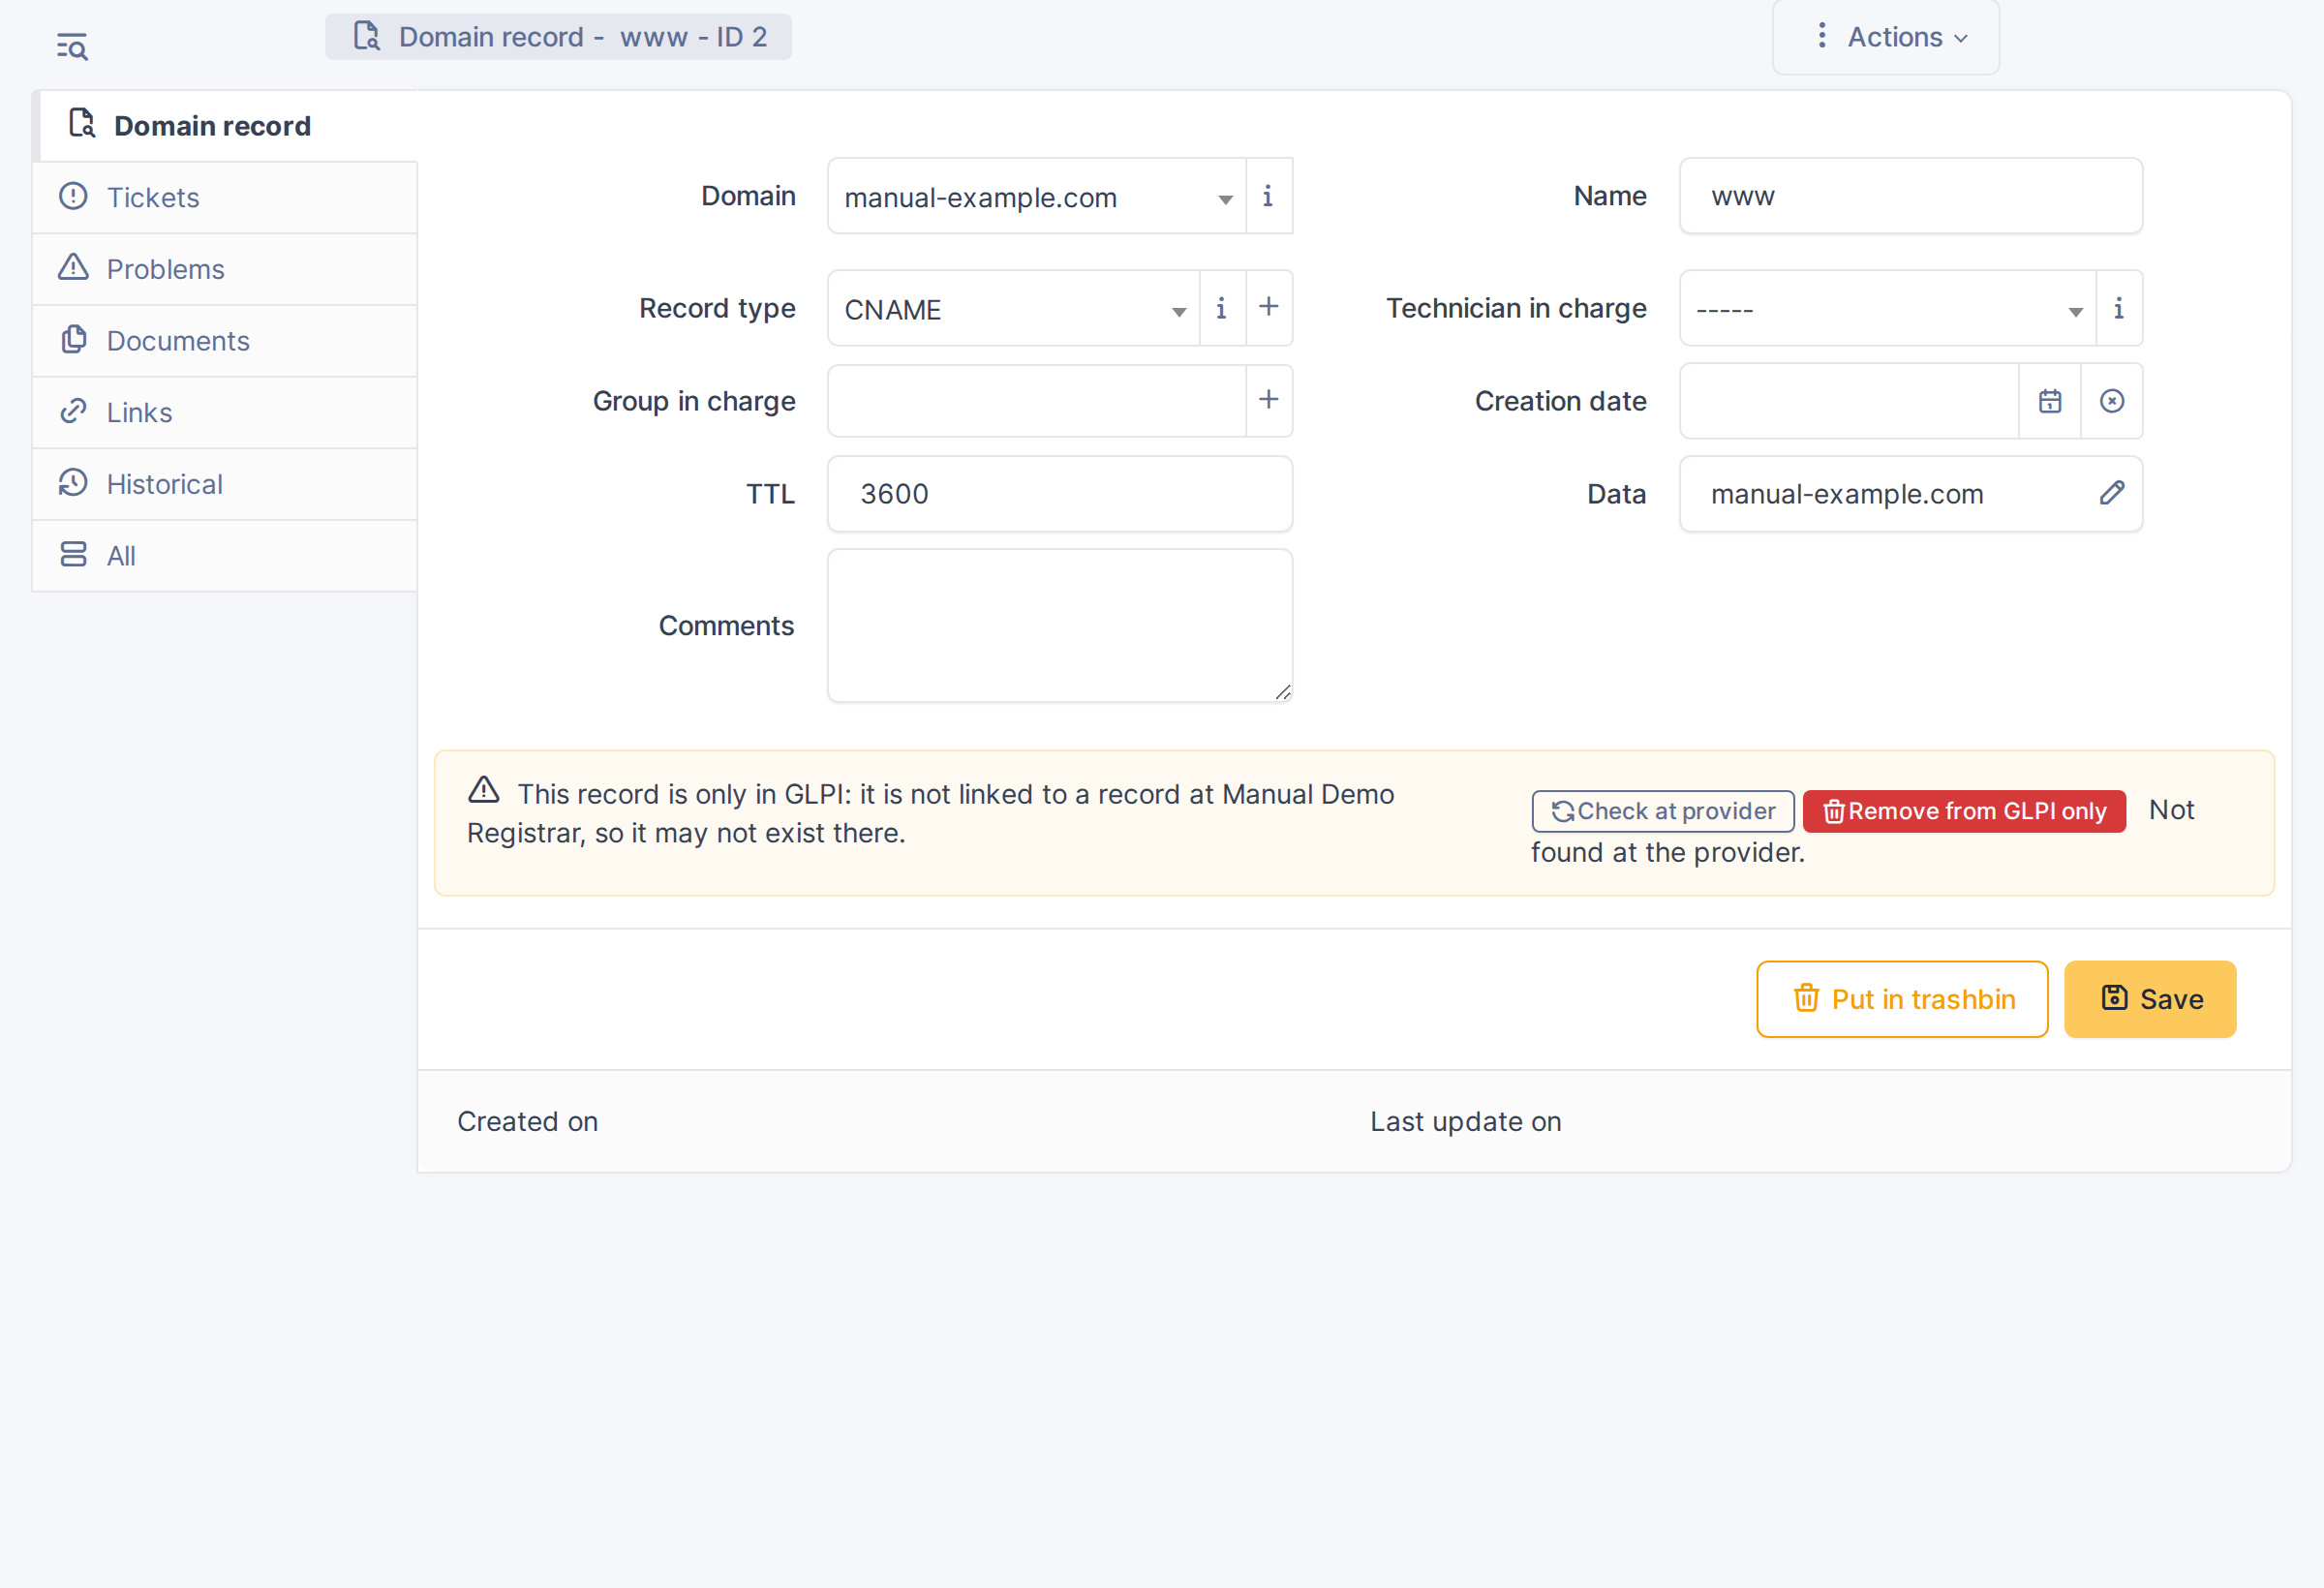
The provider has no such record, so removal from GLPI is offered
6.7 Proxy vs. origin IP indicators
When a domain is proxied through Cloudflare (or another proxy service), Domain Manager displays both the origin IP address and the proxy service's address. Visual indicators make it clear which records are being proxied.
6.7.1 Open the Records tab on a proxied domain

The records table shows both proxied (cloud icon) and non-proxied records
6.7.2 Identify which records are proxied
A cloud icon appears next to the name of any record that is proxied through Cloudflare. This small visual indicator tells you at a glance which records have proxy enabled.
The cloud icons next to proxied record names show which records are proxied
6.7.3 See the proxy service's address
Below the Target (origin IP) for any proxied record, a second line shows the proxy service's address — for Cloudflare, this is the anycast IP they're using. This address is updated automatically during each sync and acts as the public-facing address for the record.
Proxy service anycast addresses appear below the origin IP on proxied records
6.8 Dashboard cards & drill-down
Domain Manager adds a set of widgets to GLPI's own dashboard system (the same "Home" dashboard, or any custom dashboard, that other GLPI plugins and core itemtypes contribute cards to). Add them from the dashboard's Edit mode, like any other GLPI widget, then arrange and resize them as needed.
6.8.1 Add the widgets to a dashboard
On the Home page, open the dashboard selector and choose Domain Manager to see the dashboard the plugin installs. To use the cards on another dashboard, open it, click the Edit (pencil) icon, click + and pick any card from the Domain Manager group.
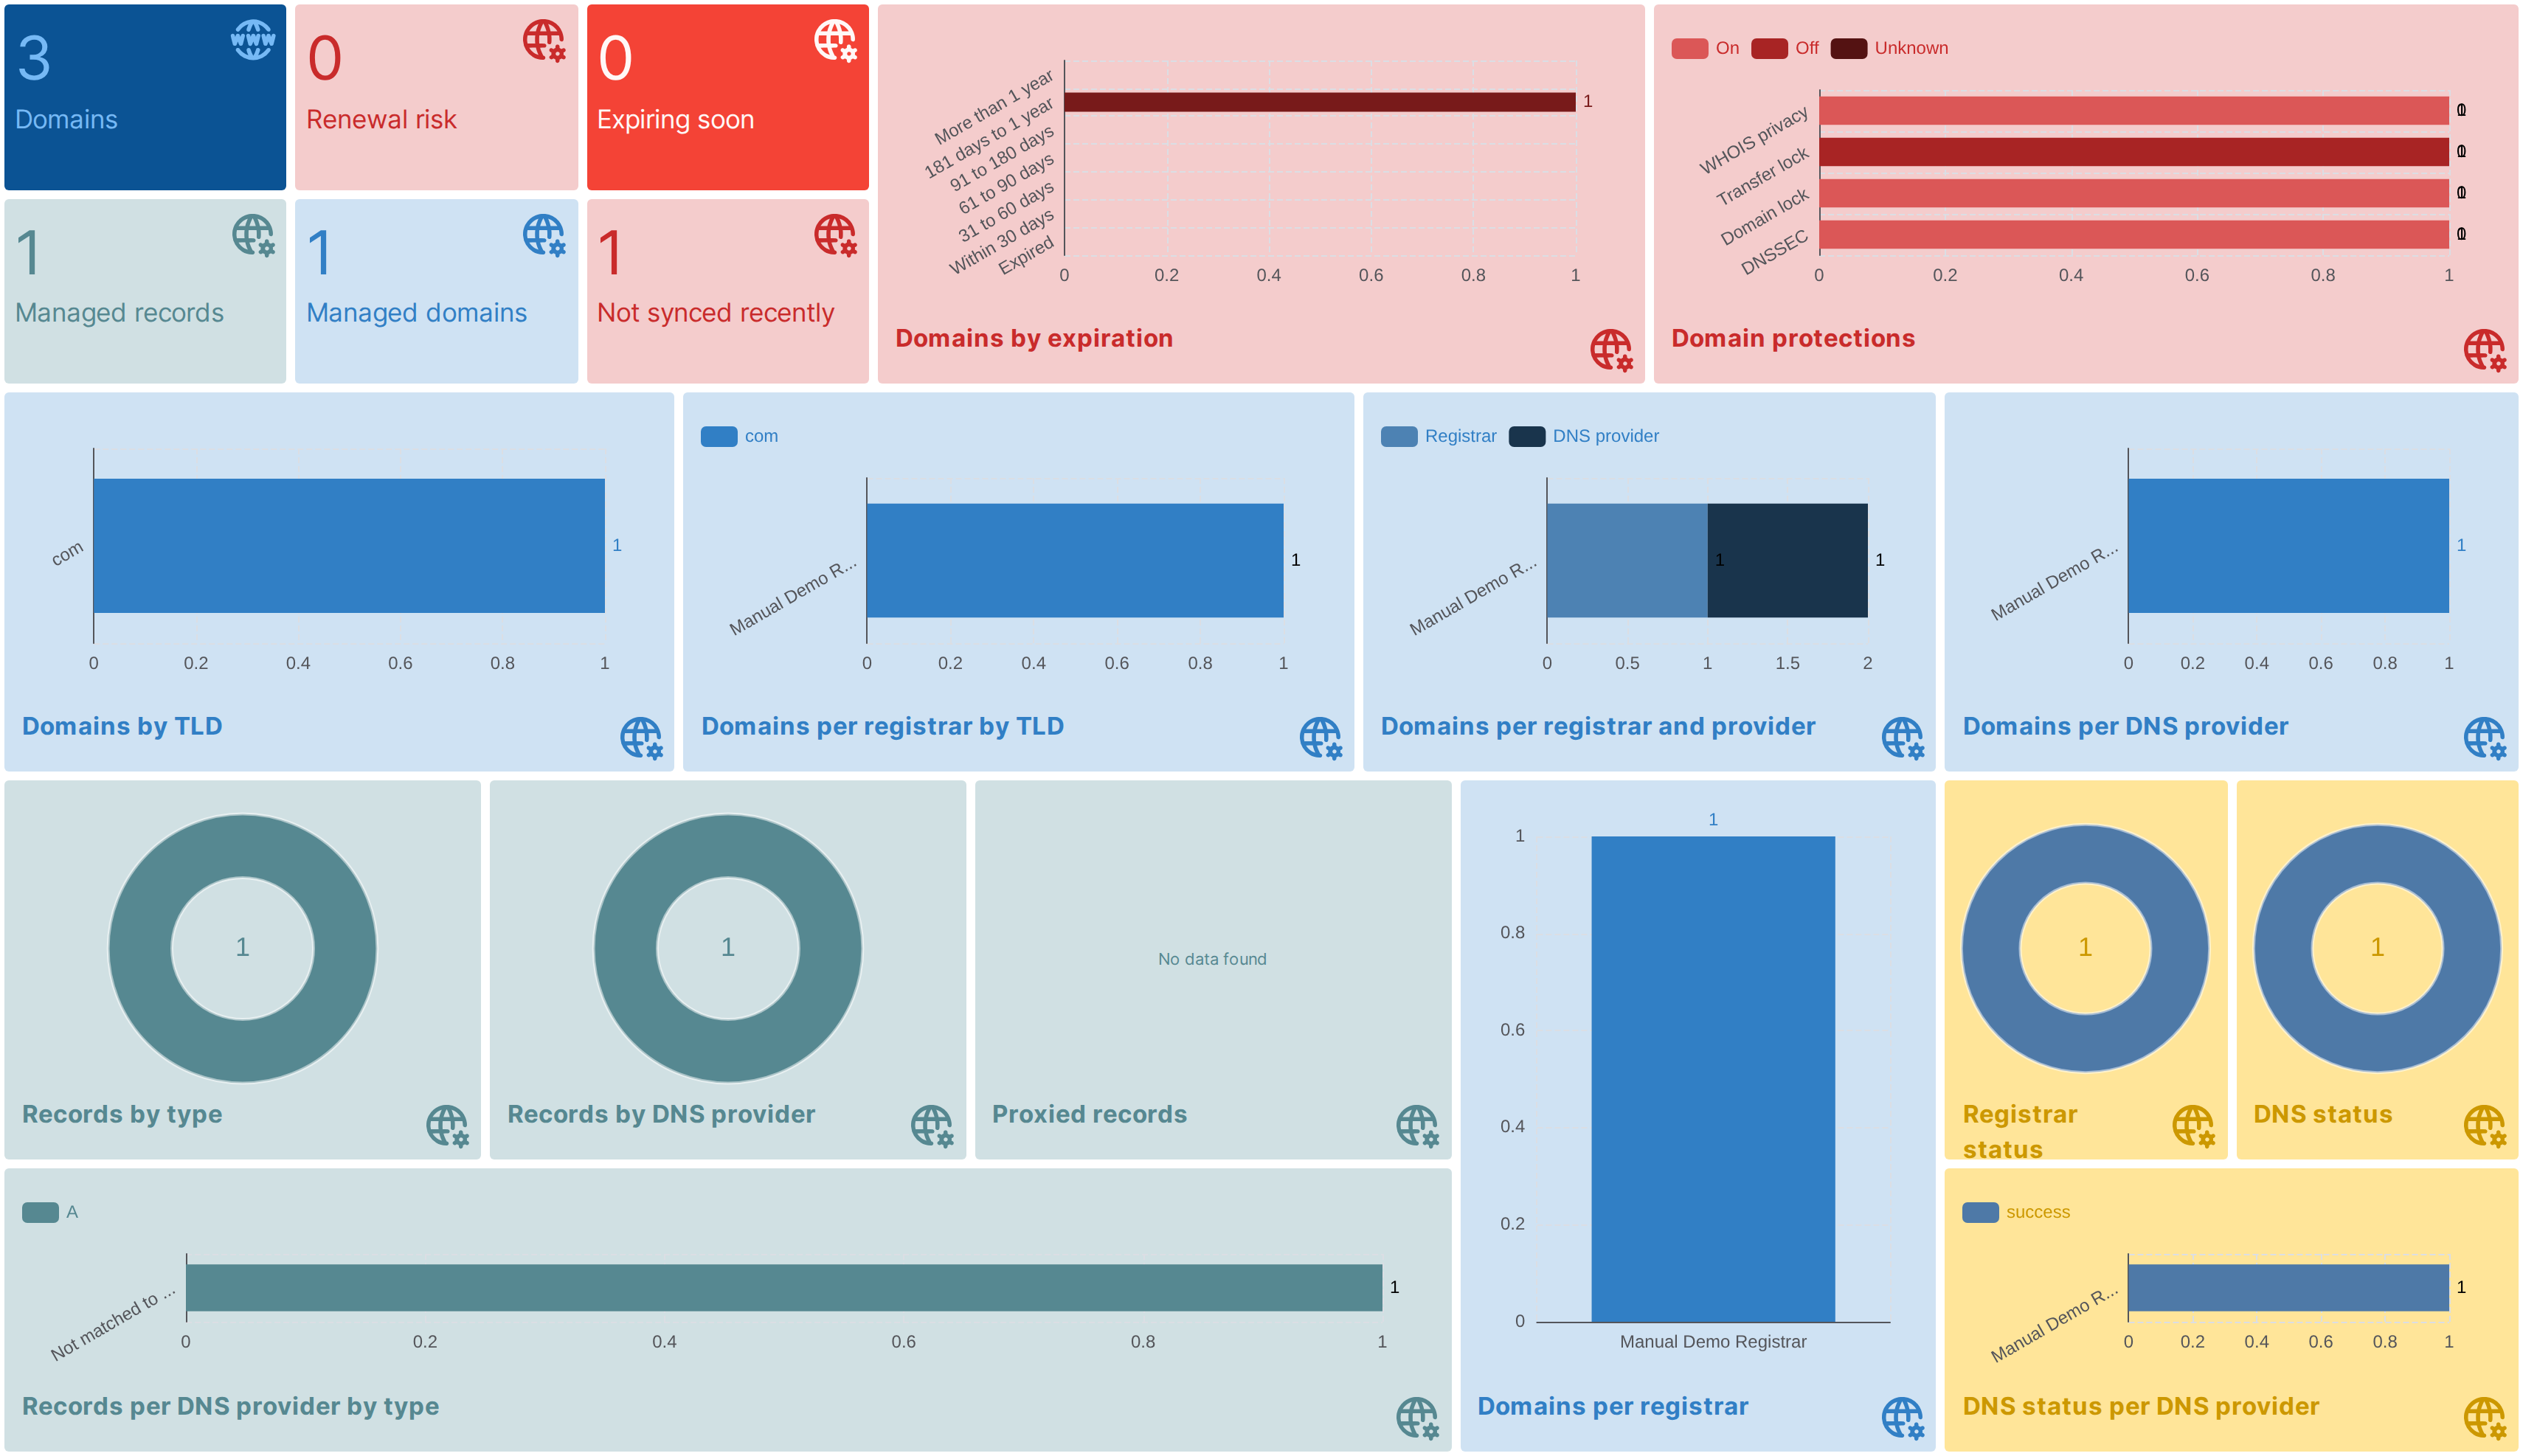
Domain Manager's dashboard cards on a GLPI dashboard
6.8.2 Available cards
- Number of Managed Domains and Number of Managed Records — simple totals.
- Number of Domains expiring soon — domains whose registration expires within 30 days.
- Domains at renewal risk — managed domains with auto-renew switched off that expire within the next 90 days.
- Domains not synced recently — managed domains whose last sync is more than 2 days old, including domains that have never synced.
- Records only in GLPI — editable DNS records that exist in GLPI but were never confirmed at the DNS provider.
- Managed domains per registrar, per DNS provider, by TLD, per registrar by TLD and per registrar and DNS provider — breakdown charts you can use to see where your domain portfolio is concentrated.
- Managed domains by expiration — how many domains expire within 30 days, 31 to 60, 61 to 90, 91 to 180 and 181 days to a year, how many expire later, and how many are already expired or have no expiry date.
- Domain protections — for each of DNSSEC, domain lock, transfer lock and WHOIS privacy, how many domains have it on, off or unknown.
- DNS sync status, DNS sync status per DNS provider and Registrar sync status — breakdowns of how many domains are currently syncing cleanly versus in a warning or error state, the fleet-wide view of the per-domain status shown on each domain.
- Managed records by type, by DNS provider, and per DNS provider by type — the same kind of breakdown, one level down at the DNS record.
- Proxied records — how many managed records are currently proxied.
6.8.3 Drilling down from a chart segment
Clicking a segment of any breakdown chart (a registrar's slice of "Managed domains per registrar", an "Error" slice of "DNS sync status", and so on) opens GLPI's Domain search already filtered to match that segment — so a spike in errors on the dashboard is one click away from the actual list of affected domains.
Generated for Domain Manager 1.8.0-beta.4 on GLPI 11.0 — 2026-10-20.